5 Ways To Remove The Background From Your Image In Photoshop
Learn how to easily remove the background from your images with these 5 simple methods using Photoshop. Say goodbye to messy backgrounds and hello to professional-looking photos!
Download the app, NOW!


.png)

.png)


PhotoCut - A Game Changer!
Explore endless tools and templates at your fingertips to customize your new image using the PhotoCut app. They love us. You will too.
.webp)
CAPTAIN SYKE

So much easy to use than the other apps that I have encountered. I'm so satisfied. I fished to clear the background less than a minute! Keep it up🙌🏻
.webp)
Lee Willetts (Dr.Drone Doomstone)
Great app, used alongside text on photo, you can create some great pics. Hours of fun.
.webp)
Bran Laser
I always erase and cut something with this it is very op there is no bug and I made a picture for my channel very nice install it now!
.webp)
ZDX Gaming
The Best Photo Editor .. Not Many Can Actually Cut Pictures Perfectly Like this App been looking for something like this for a long time 💔😂 Nice App I recommend it Giving it 5 star
.webp)
Small Optics
Best app of this type out there, it does nearly all of the work for you.. Great work developers.
.webp)
Emilia Gacha
It's really useful and super easy to use and it may be the best background eraser app!
.webp)
kymani ace
This is a really nice app I love how it let's me do lots of edits without paying for anything and there isn't even a watermark, very good app.
.webp)
Nidhish Singh
Excellent apps and doing all the work as expected. Easy to use, navigate and apply to any background after cut out.
.webp)
Adrian
Been using this app for many years now to crop photos and gotta say, really does what it's supposed to and makes photo's look realistic. Recommend it very much.
.webp)
Indra Ismaya
Easy to use, very usefull
.webp)
Barbie Dream
I love this app! You can edit and change the background i been using it for months for my video! Keep it going.
.webp)
Kaira Binson
Ouh..finally i found a good app like this..after instalking 6-8 apps ..i finally get the right one...easy..free...so cool...but maybe pls..adjust your ads..in this app..thanks☺
.webp)
Tara Coriell
I payed for premium but it was only a 1 time payment of 5.29 and I love this app. There are a lot of nice features

Engels Yepez
Great app for edit photos, it include an interesting IA function for apply effects to your pics

Azizah ahmad
This apps is awesome compared to other photo cut apps. I have tried several photo cut apps but all of them was bad. And finally i found this app, super easy to use, have feature smart cut and smart erase. Awesome !!
.webp)
Galaxy Goat
The app is incredible! I erased a background and added it into a new background in less then 20 seconds. Normally it takes 10-20 minute's on other apps. Highly recommend
.webp)
Victor Maldonado
I been having a few issues with app can't zoom in like before and its not like it use to what happen i paid for this app not liking the new upgrade
.webp)
Lynsiah Sahuji
more accurate in removing background, didn't required so much effort. love this! ❤️


You can use the following tools in Photoshop to remove the background from an image:
Quick selection tool
Background eraser tool
Pen tool
Photoshop quick action tool
Magnetic lasso tool
1. Background Eraser Tool
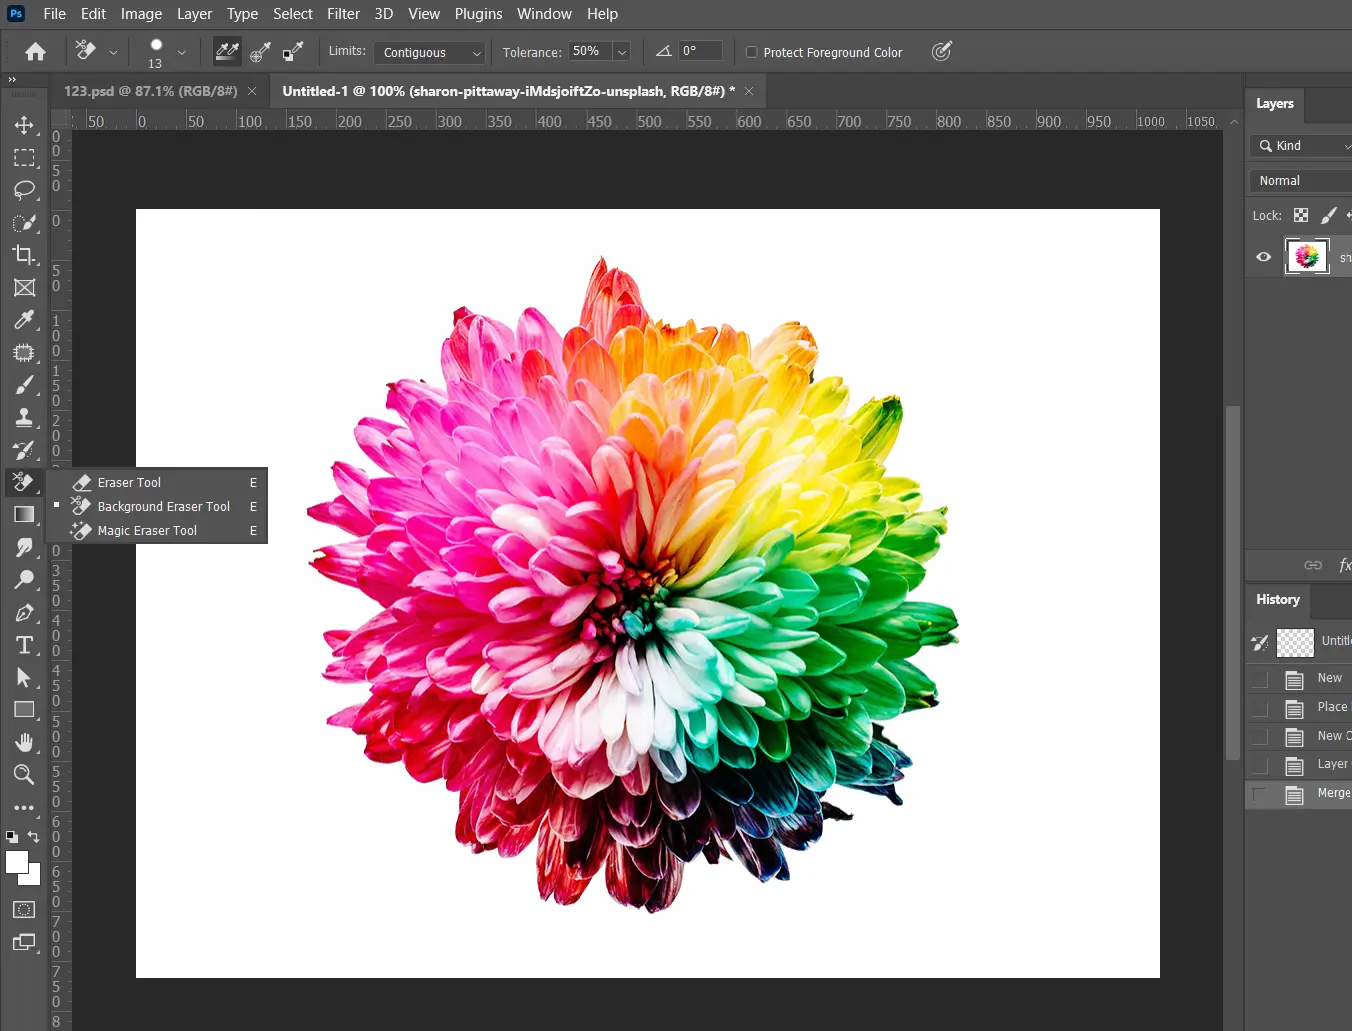
The background eraser tool is considered a ‘destructive’ way to remove the image background in Photoshop. This tool does most of the work while giving you a fair bit of control. However, you will find that removing the background from an image in Photoshop with this tool can take a lot of time and patience.
How to use the Background Eraser tool
Step:1 - Considering this is a destructive tool, you should start by making a copy of the image you want to edit and erase the copy.
Step:2 - Click on the tools palette and look for the background eraser tool.
Step:3 - Once you do this, click on the first option on top to change the brush size, hardness, and spacing to your liking. After all, the background eraser is a brush, so you will have to set the size depending on how you want to paint - wide or with precision.
Step:4 - You will find sampling options right beside the size option. The sampling options are: continuous, once, and swatch. Choose the one that works the best, depending on how much of the image you want to delete.
Step:5 - Next, go to the Limits option and choose from contiguous, discontiguous, and find edges. The continuous option allows you to erase the pixels that are physically touching pixels under the crosshair. The find edges option operates similarly since it erases pixels touching the crosshair. However, it is much sharper and more precise.
Step:6 - Once you are satisfied with the resulting image, save the project and export the image as a PNG.
2. Quick Selection Tool
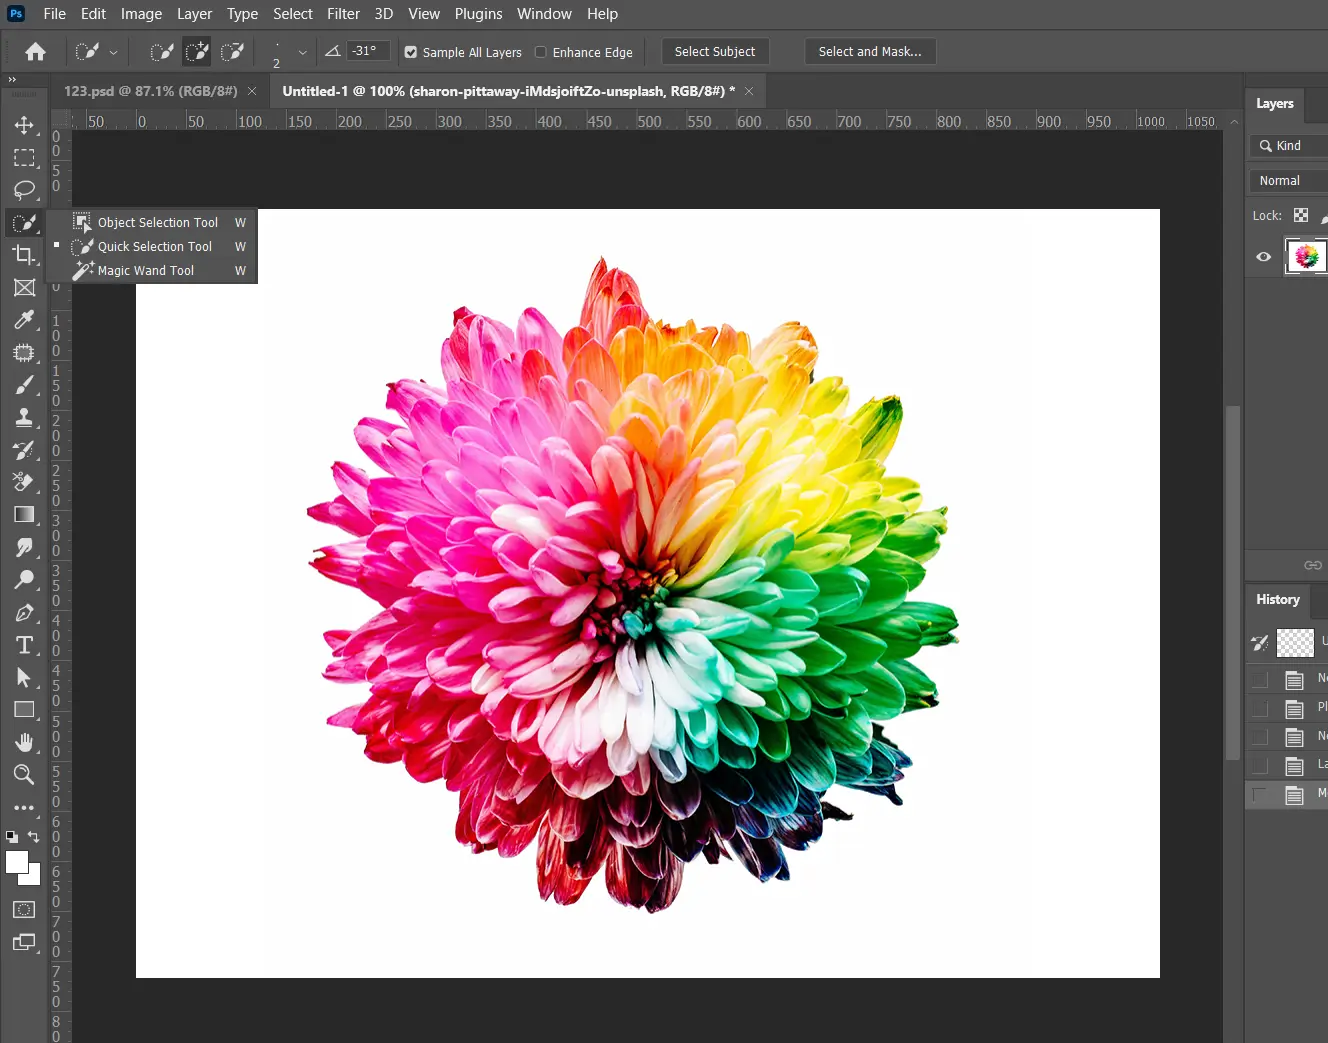
Best used for personal editing, the quick selection tool is often regarded as one of the most accessible tools to remove an image’s background with decent accuracy. It works best when:
There is a clear contrast between the background and foreground.
You want to save time and remove the background from the image with decent accuracy and quickly refine the edges.
How to use the Quick Selection tool
Step:1 - Start by opening an image in Photoshop and duplicating it. For this, right-click on your background and click on the duplicate layer. Name the layer and hit the eye icon on the left to turn off the layer.
Step:2 - Then, click on Photoshop’s tools palette and find the quick selection tool, which you will find along with the magic wand tool and the object selection tool.
Step:3 - Check the Auto Enhance option on top to give you smoother selection edges.
Step:4 - Now, move the pointer over the areas that you want to select. If you want to add more areas to the selection, you must move your pointer over those areas.
Step:5 - However, if you’ve added too many areas to the selection and want to remove them, use the alt key (if you are using windows) or the option key (on macOS) to deselect the area. You can also change tools to deselect the areas you do not want to add to the selection.
Refine Edges
Step:6 - Right-click on the selection within the marching ants and select Refine Edge. You will find a dialogue box that you can use to fine-tune your selection significantly. Under view mode, you can view the selection against various backgrounds.
Step:7 - Then, head to the Edge Detection option, click Smart Radius and adjust the radius to your liking. You will also find the Refine Radius Tool on the left of the edge detection tool. Click on that, go to the upper left corner, and adjust the tool size. This will help you refine the edges accurately. Finally, right-click within your selection and click on Layer Via Copy.
Step:8 -Finally, please create a new file and drag and drop the selection onto this file and export it as a PNG file.
3. Pen Tool
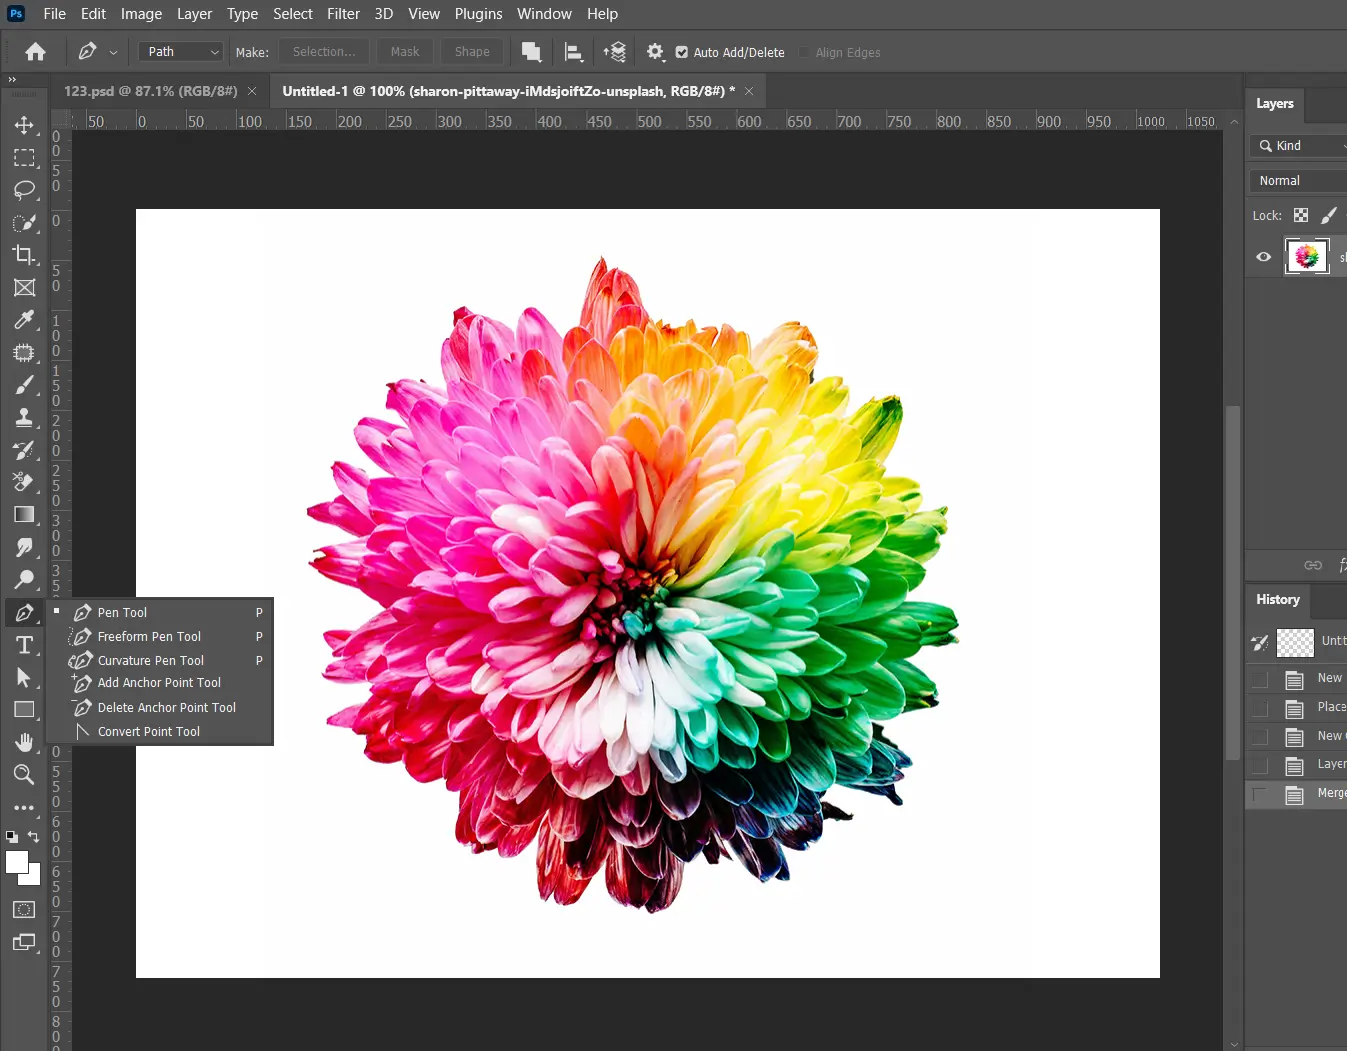
The pen tool gives you more control than any Photoshop background removal tool. It is the most accurate way to remove backgrounds, working best for images with transparent, defined edges. The pen tool is perfect for professional editing. That said, it can also cost you a lot of time.
How to use the Pen Tool
Step:1 - As always, open the image and make a copy of it before you start editing. Hit Duplicate Layer for this. Also, go to Window → Paths before you get started.
Step:2 - Now, head to your tools palette and look for the pen tool above the text tool.
Step:3 - Find a suitable place, preferably an edge, and click to start the anchor. After this, you will have to work around the subject carefully.
Step:4 - Remember that you will generally deal with two types of curves - simple and complex.
Step:5 - When you find curves, you will have to click, hold, and drag to create a curved line and move the mouse pointer to adjust the length and angle of the curved line. One of the benefits of the pen tool is that you can edit your pen tool paths at any point.
Step:6 - Once you are done tracing your subject, head to the paths box you opened at the beginning and click on the thumbnail of the path you are working on. In this case, you will find one path for your subject. Click on the thumbnail. Doing this will turn your subject into a selection.
Step:7 - If you need to fine-tune your selection further, consider using the refine edge tool explained above.
Step:8 - Click on your layer and the layer mask icon below to load the selection. Once satisfied with the selection, create a new file, and drag and drop the selection to the new file. Then, export this image as a PNG file.
4. Photoshop Quick Action Tool
The Photoshop quick action tool is the quickest way to remove the background using photoshop. That said, you can expect to compromise on accuracy, which is why this tool is best used for personal editing.
How to use the Photoshop Quick Action Tool
Step:1 - Open the image and head over to the layer panel. You will notice that your
Step:2 - Click on the image to unlock it. The layer name will change from ‘Background’ to ‘Layer 0.’
Step:3 - Go to Window → Properties, and you will find a dialogue box. Here, you will find the following options under Quick Action: ‘Remove Background’ & ‘Select Subject’.
Step:4 - If you click on ‘Remove Background,’ the file will get automatically rendered, and the background will be removed. Then, save the resulting image and export it as a PNG.
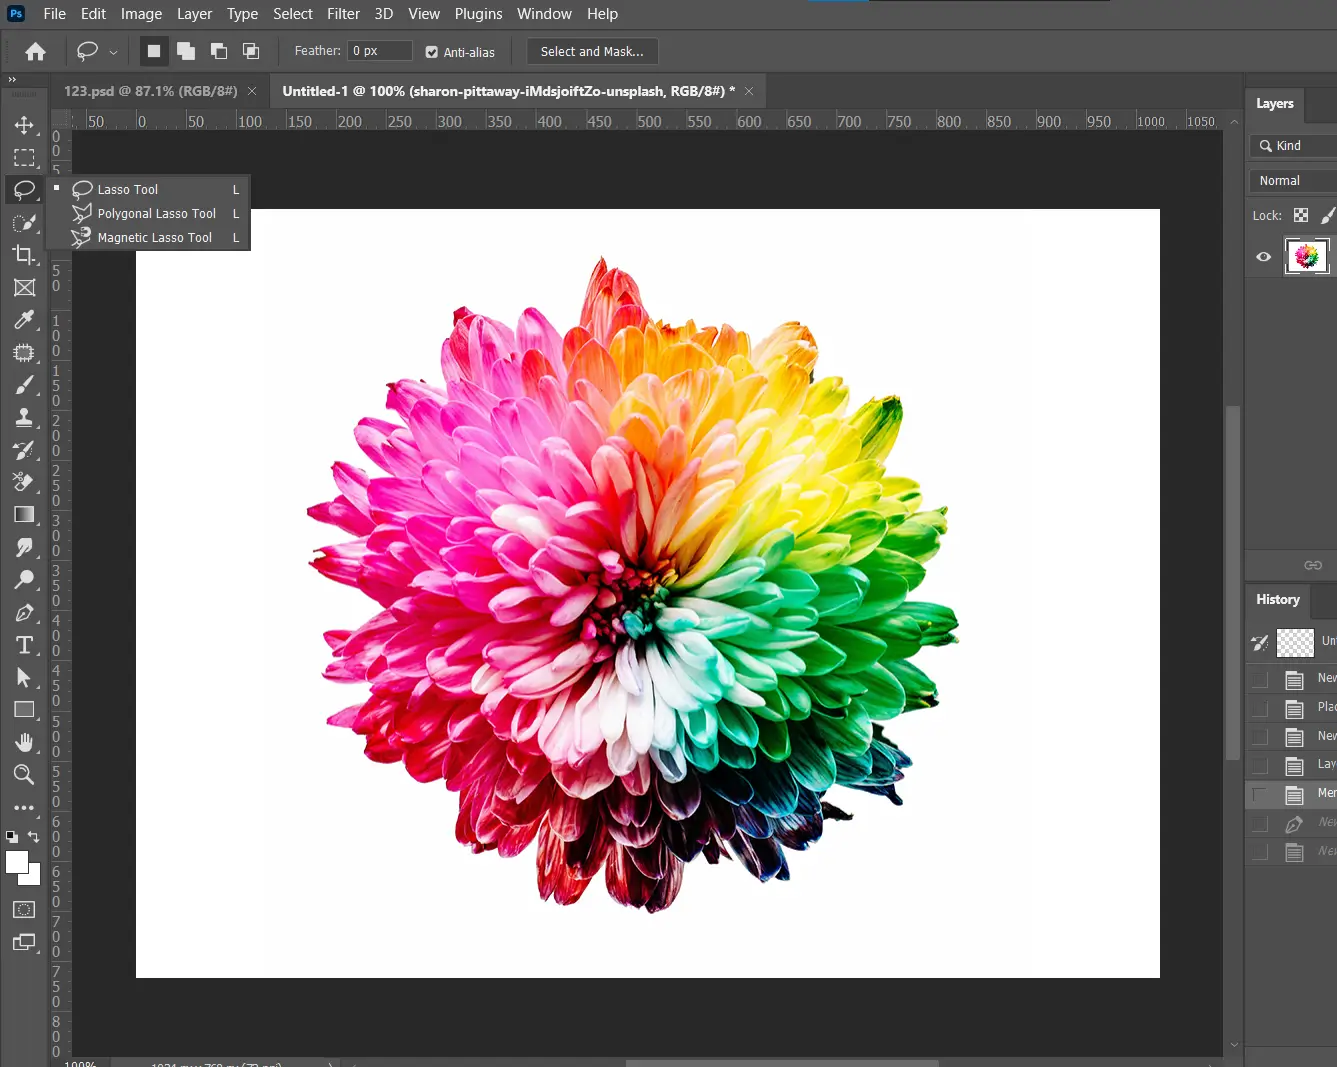
Step: 5- Magnetic Lasso Tool
The magnetic lasso tool requires some time and patience. This tool is for you if you are comfortable with accessible hand selections.
How to use the Magnetic Lasso Tool
Step:1 - Select the magnetic lasso tool from the tools palette on the left and use it to start drawing along the edge of the subject. You will need to be slow and patient as you move your cursor.
Step:2 - Once you use the tool and have a starting point, cover all the edges and return to the starting point to make a selection. This selection will turn into marching ants, as with all the other methods mentioned.
Step:3 - Go to Selection → Save Selection and give it a name.
Step:4 - Then, Selection → Inverse and hit delete to remove the background. At this point, you will find a white/grey checkered background instead of the original one.
Step:5 - To make adjustments, either backtrack your actions, use the polygonal lasso tool or the refine edge option, as explained earlier.
You might also be interested in


FAQ’s
I recommend checking out our detailed step-by-step guide on How to Use a Free Photo Editor. It covers everything from downloading and installing to using the essential tools and techniques for enhancing your photos.